IBM Cloud Container Workshop
Guestbook Hybrid Deployment
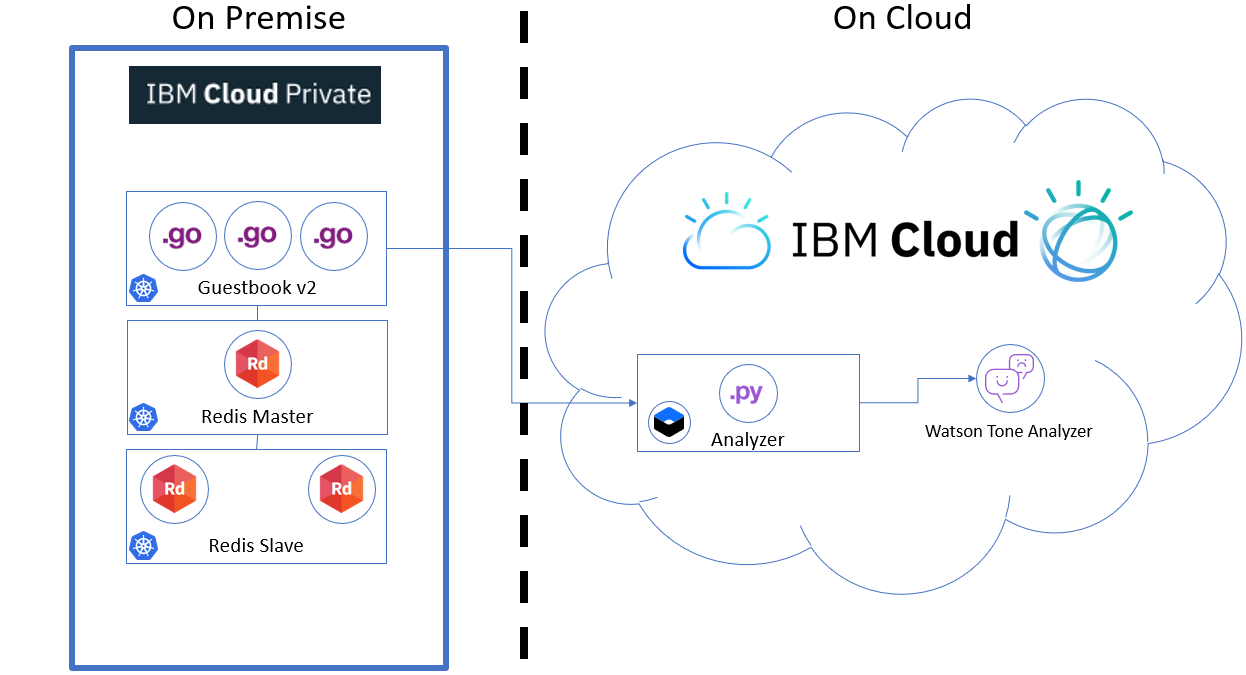
This example shows how to build a simple hybrid multi-tier web application using ICP and IBM Cloud services.
The application consists of a web front end, Redis master for storage, and replicated set of Redis slaves, all for which we will create Kubernetes deployments, pods, and services and an sentiment analyzer service which is connected to IBM Watson Tone Analyzer service on IBM Cloud
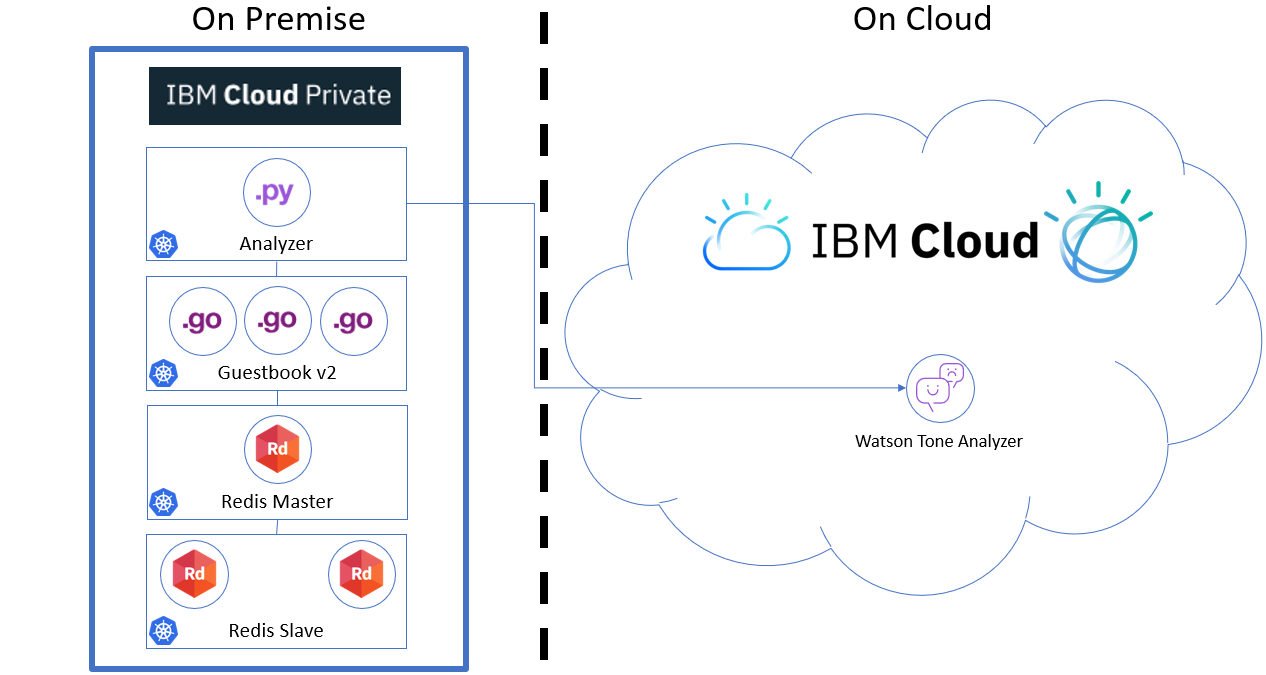
Table of Contents
- Prerequisites
- Create the Redis master pod
- Create the Redis master service
- Create the Redis slave pods
- Create the Redis slave service
- Create the guestbook pods
- Create the guestbook service
- Create Watson Tone Analyzer on IBM Cloud
- Manage connection to IBM Cloud configuration : Secret & ConfigMaps
- View the guestbook
- Cleanup
Prerequisites
This lab assumes that you have ICP installed and configured.
First run the following command to connect to your ICP instance :
cloudctl login -u admin -p admin1! -n default
Go to your home directory :
cd
Then Clone the ICPGuestbook git repo :
git clone https://github.com/fdescollonges/ICPGuestbook.git
Create the Redis master pod
Use the redis-master-deployment.yaml file to create a deployment and Redis master pod. The pod runs a Redis key-value server in a container. Using a deployment controller is the preferred way to launch long-running pods, even for 1 replica, so that the pod benefits from the self-healing mechanism in Kubernetes (keeps the pods alive).
-
Use the redis-master-deployment.yaml file to create the Redis master deployment in your Kubernetes cluster by running the
kubectl apply -ffilenamecommand:root@iccws101:~/ICPGuestbook# kubectl apply -f redis-master-deployment.yaml deployment.apps/redis-master created -
To verify that the redis-master controller is up, list the deployments you created in the cluster with the
kubectl get deploymentcommand (if you don’t specify a--namespace, thedefaultnamespace will be used. The same below):root@iccws101:~/ICPGuestbook# kubectl get deployment NAME DESIRED CURRENT UP-TO-DATE AVAILABLE AGE redis-master 1 1 1 1 51sResult: The delpoyment then creates the single Redis master pod.
-
To verify that the redis-master pod is running, list the pods you created in cluster with the
kubectl get podscommand:root@iccws101:~/ICPGuestbook# kubectl get pods NAME READY STATUS RESTARTS AGE redis-master-7b5cc58fc8-x6m2b 1/1 Running 0 54m ...Result: You’ll see a single Redis master pod and the machine where the pod is running after the pod gets placed (may take up to thirty seconds).
Create the Redis master service
A Kubernetes service is a named load balancer that proxies traffic to one or more pods. The services in a Kubernetes cluster are discoverable inside other pods via environment variables or DNS.
Services find the pods to load balance based on pod labels. The pod that you created in previous step has the label app=redis and role=master. The selector field of the service determines which pods will receive the traffic sent to the service.
-
Use the redis-master-service.yaml file to create the service in your Kubernetes cluster by running the
kubectl apply -ffilenamecommand:root@iccws101:~/ICPGuestbook# kubectl apply -f redis-master-service.yaml service/redis-master created -
To verify that the redis-master service is up, list the services you created in the cluster with the
kubectl get servicescommand:root@iccws101:~/ICPGuestbook# kubectl get services NAME TYPE CLUSTER-IP EXTERNAL-IP PORT(S) AGE kubernetes ClusterIP 10.0.0.1 <none> 443/TCP 47h redis-master ClusterIP 10.0.14.216 <none> 6379/TCP 99sResult: All new pods will see the
redis-masterservice running on the host ($REDIS_MASTER_SERVICE_HOSTenvironment variable) at port6379, or running onredis-master:6379. After the service is created, the service proxy on each node is configured to set up a proxy on the specified port (in our example, that’s port6379).
Create the Redis slave pods
The Redis master we created earlier is a single pod (REPLICAS = 1), while the Redis read slaves we are creating here are ‘replicated’ pods. In Kubernetes, a deployment is responsible for managing the multiple instances of a replicated pod.
-
Use the file redis-slave-deployment.yaml to create the deployment by running the
kubectl apply -ffilenamecommand:root@iccws101:~/ICPGuestbook# kubectl apply -f redis-slave-deployment.yaml Error from server (InternalError): error when creating "redis-slave-deployment.yaml": Internal error occurred: admission webhook "trust.hooks.securityenforcement.admission.cloud.ibm.com" denied the request: Deny "docker.io/kubernetes/redis-slave:v2", no matching repositories in ClusterImagePolicy and no ImagePolicies in the "default" namespaceWith ICP, you can restrict the repositories from which your developpers can pull base images. In order to make Redis slaves to run, we have to add several repository to the image policies.
-
Create a ImagePolicy file :
nano guestbook-imagepolicy.yaml
apiVersion: securityenforcement.admission.cloud.ibm.com/v1beta1
kind: ImagePolicy
metadata:
  generation: 1
  name: guestbookimagepolicy
  namespace: default
  resourceVersion: "218506"
  selfLink: /apis/securityenforcement.admission.cloud.ibm.com/v1beta1/namespaces/guestbook/imagepolicies/guestbookimagepolicy
  uid: df3fd7f3-4a46-11e9-969c-06f6c97769e8
spec:
  repositories:
  - name: docker.io/*
    policy:
      va:
        enabled: false
  - name: docker.io/kubernetes/*
    policy:
      va:
        enabled: false
  - name: docker.io/ibmcom/*
    policy:
      va:
        enabled: false
  - name: mycluster.icp:8500/guestbook/*
    policy:
      va:
        enabled: false
Hit ctrl-o, Enter then ctrl-x to save the file
Apply this file :
kubectl apply -f guestbook-imagepolicy.yaml
root@iccws101:~/ICPGuestbook# kubectl apply -f guestbook-imagepolicy.yaml
imagepolicy.securityenforcement.admission.cloud.ibm.com/guestbookimagepolicy created
Re execute kubectl apply -f redis-slave-deployment.yaml to create the Redis slave deployment.
root@iccws101:~/ICPGuestbook# kubectl apply -f redis-slave-deployment.yaml
deployment.apps/redis-slave created
-
To verify that the redis-slave deployment is running, run the
kubectl get deploymentcommand:root@iccws101:~/ICPGuestbook# kubectl get deployment NAME DESIRED CURRENT UP-TO-DATE AVAILABLE AGE redis-master 1 1 1 1 21m redis-slave 2 2 2 2 5m24sResult: The deployment creates and configures the Redis slave pods through the redis-master service (name:port pair, in our example that’s
redis-master:6379).Example: The Redis slaves get started by the deployment with the following command:
redis-server --slaveof redis-master 6379 -
To verify that the Redis master and slaves pods are running, run the
kubectl get podscommand:root@iccws101:~/ICPGuestbook# kubectl get pods NAME READY STATUS RESTARTS AGE redis-master-7b5cc58fc8-phhdh 1/1 Running 0 21m redis-slave-5db5dcfdfd-2mx4j 1/1 Running 0 5m48s redis-slave-5db5dcfdfd-q6gfz 1/1 Running 0 5m48sResult: You see the single Redis master and two Redis slave pods.
Create the Redis slave service
Just like the master, we want to have a service to proxy connections to the read slaves. In this case, in addition to discovery, the Redis slave service provides transparent load balancing to clients.
-
Use the redis-slave-service.yaml file to create the Redis slave service by running the
kubectl create -ffilenamecommand:root@iccws101:~/ICPGuestbook# kubectl create -f redis-slave-service.yaml service/redis-slave created -
To verify that the redis-slave service is up, list the services you created in the cluster with the
kubectl get servicescommand:root@iccws101:~/ICPGuestbook# kubectl get services NAME TYPE CLUSTER-IP EXTERNAL-IP PORT(S) AGE kubernetes ClusterIP 10.0.0.1 <none> 443/TCP 47h redis-master ClusterIP 10.0.14.216 <none> 6379/TCP 24m redis-slave ClusterIP 10.0.186.203 <none> 6379/TCP 42sResult: The service is created with labels
app=redisandrole=slaveto identify that the pods are running the Redis slaves.
Tip: It is helpful to set labels on your services themselves–as we’ve done here–to make it easy to locate them later.
Create the guestbook pods
This is a simple Go net/http (negroni based) server that is configured to talk to either the slave or master services depending on whether the request is a read or a write. The pods we are creating expose a simple JSON interface and serves a jQuery-Ajax based UI. Like the Redis slaves, these pods are also managed by a deployment.
-
Use the guestbook-deployment.yaml file to create the guestbook deployment by running the
kubectl apply -ffilenamecommand:root@iccws101:~/ICPGuestbook# kubectl apply -f guestbook-deployment.yaml deployment.apps/guestbook-v2 created
Tip: If you want to modify the guestbook code it can be found in the guestbook directory, along with its Makefile. If you have pushed your custom image be sure to update the image property accordingly in the guestbook-deployment.yaml.
-
To verify that the guestbook deployment is running, run the
kubectl get deploymentcommand:root@iccws101:~/ICPGuestbook# kubectl get deployment NAME DESIRED CURRENT UP-TO-DATE AVAILABLE AGE guestbook-v2 3 3 3 3 57s redis-master 1 1 1 1 102m redis-slave 2 2 2 2 86m -
To verify that the guestbook pods are running (it might take up to thirty seconds to create the pods), list the pods you created in cluster with the
kubectl get podscommand:root@iccws101:~/ICPGuestbook# kubectl get pods NAME READY STATUS RESTARTS AGE guestbook-v2-96f8b7fb8-5rfpw 1/1 Running 0 105s guestbook-v2-96f8b7fb8-srcrx 1/1 Running 0 105s guestbook-v2-96f8b7fb8-zlt84 1/1 Running 0 105s redis-master-7b5cc58fc8-phhdh 1/1 Running 0 103m redis-slave-5db5dcfdfd-2mx4j 1/1 Running 0 87m redis-slave-5db5dcfdfd-q6gfz 1/1 Running 0 87mResult: You see a single Redis master, two Redis slaves, and three guestbook pods.
Create the guestbook service
Just like the others, we create a service to group the guestbook pods but this time, to make the guestbook front end externally visible, we specify "type": "NodePort".
-
Use the guestbook-service.yaml file to create the guestbook service by running the
kubectl apply -ffilenamecommand:root@iccws101:~/ICPGuestbook# kubectl apply -f guestbook-service.yaml service/guestbook created -
To verify that the guestbook service is up, list the services you created in the cluster with the
kubectl get servicescommand:root@iccws101:~/ICPGuestbook# kubectl get services NAME TYPE CLUSTER-IP EXTERNAL-IP PORT(S) AGE analyzer ClusterIP 10.0.37.73 <none> 80/TCP 2m44s guestbook NodePort 10.0.228.206 <none> 80:32175/TCP 2m44s kubernetes ClusterIP 10.0.0.1 <none> 443/TCP 2d23h redis-master ClusterIP 10.0.251.59 <none> 6379/TCP 2m44s redis-slave ClusterIP 10.0.22.228 <none> 6379/TCP 2m43sResult: The service is created with label
app=guestbook.
Create Watson Tone Analyzer on IBM Cloud
Watson Tone Analyzer detects the tone from the words that users enter into the Guestbook app. The tone is converted to the corresponding emoticons.
-
If not done in previous lab, install the IBM Cloud command line interface to access IBM Cloud public on your virtual server :
curl -sL https://ibm.biz/idt-installer | bash -
Log in to the IBM Cloud CLI using your own IBM ID created in preparation lab :https://github.com/fdescollonges/ContainerWkshp/blob/master/1-PrepareLab.md
ibmcloud login
# ibmcloud login
API endpoint: https://cloud.ibm.com
Region: eu-gb

Email> tufih@mailfavorite.com

Password>
Authenticating...
OK

Targeted account ICCWS ICCWS's Account (95f04fe00e284449bd3990ee72688be3)

Targeted resource group Default


API endpoint:      https://cloud.ibm.com
Region:            eu-gb
User:              tufih@mailfavorite.com
Account:           ICCWS ICCWS's Account (95f04fe00e284449bd3990ee72688be3)
Resource group:    Default
CF API endpoint:
Org:
Space:

Tip: If you are managing Cloud Foundry applications and services
- Use 'ibmcloud target --cf' to target Cloud Foundry org/space interactively, or use 'ibmcloud target --cf-api ENDPOINT -o ORG -s SPACE' to target the org/space.
- Use 'ibmcloud cf' if you want to run the Cloud Foundry CLI with current IBM Cloud CLI context.
-
Create Watson Tone Analyzer in your account.
ibmcloud resource service-instance-create my-tone-analyzer-service tone-analyzer lite us-south
  root@iccws101:~/ICPGuestbook# ibmcloud resource service-instance-create my-tone-analyzer-service tone-analyzer lite us-south
   Creating service instance my-tone-analyzer-service in resource group Default of account ICCWS ICCWS's Account as tufih@mailfavorite.com...
   OK
   Service instance my-tone-analyzer-service was created.

   Name:                                my-tone-analyzer-service
   ID:                                  crn:v1:bluemix:public:tone-analyzer:us-south:a/95f04fe00e284449bd3990ee72688be3:f755c4fa-be4a-4c9f-9b66-45773412abb0::
   GUID:                                f755c4fa-be4a-4c9f-9b66-45773412abb0
   Location:                            us-south
   State:                               active
   Type:                                service_instance
   Sub Type:
   External Service Endpoint Enabled:   false
   Internal Service Endpoint Enabled:   false
   Created at:                          2019-03-28T14:16:26Z
   Updated at:                          2019-03-28T14:16:26Z
Create the service key for the Tone Analyzer service. This command should output the credentials you just created. You will need the value for apikey & url later.
ibmcloud resource service-key-create tone-analyzer-key Manager --instance-name my-tone-analyzer-service
root@iccws101:~/ICPGuestbook# ibmcloud resource service-key-create tone-analyzer-key Manager --instance-name my-tone-analyzer-service

Creating service key of service instance my-tone-analyzer-service under account ICCWS ICCWS's Account as tufih@mailfavorite.com...
AAA: de2d50dd82ac4a19aa30a74a5807afdb
OK
Service key crn:v1:bluemix:public:tone-analyzer:us-south:a/95f04fe00e284449bd3990ee72688be3:f755c4fa-be4a-4c9f-9b66-45773412abb0:resource-key:738cecf2-c140-410d-ba68-d4d81658a1b8 was created.

Name:          tone-analyzer-key
ID:            crn:v1:bluemix:public:tone-analyzer:us-south:a/95f04fe00e284449bd3990ee72688be3:f755c4fa-be4a-4c9f-9b66-45773412abb0:resource-key:738cecf2-c140-410d-ba68-d4d81658a1b8
Created At:    Thu Mar 28 14:17:23 UTC 2019
State:         active
Credentials:
               iam_apikey_name:          auto-generated-apikey-738cecf2-c140-410d-ba68-d4d81658a1b8
               iam_role_crn:             crn:v1:bluemix:public:iam::::serviceRole:Manager
               iam_serviceid_crn:        crn:v1:bluemix:public:iam-identity::a/95f04fe00e284449bd3990ee72688be3::serviceid:ServiceId-bb3e3496-7a4f-4326-aa07-235774946f6e
               url:                      https://gateway.watsonplatform.net/tone-analyzer/api
               apikey:                   xxxx-xxxxxxxxxxxxxxxxxxxxxxxxxxxxxxxxxxxxxxxx
               iam_apikey_description:   Auto generated apikey during resource-key operation for Instance - crn:v1:bluemix:public:tone-analyzer:us-south:a/95f04fe00e284449bd3990ee72688be3:f755c4fa-be4a-4c9f-9b66-45773412abb0::
-
if you need to get the service-keys later, you can use the following command:
ibmcloud resource service-key tone-analyzer-key
Manage connection to IBM Cloud configuration : Secret & ConfigMaps
To externalize the configuration of the remote service, we will use 2 Kubernetes resources : Secrets (to manage passwords and keys) and ConfigMaps (to manager environment configuration).
-
Create Secret containing API Key (replace YOUR_APIKEY with your api key from previous step. Keep the quotes around the key)
echo -n 'YOUR_APIKEY' > ./wta-apikeykubectl create secret generic wta-apikey-secret --from-file=./wta-apikey -
Create ConfigMap containing Environment variable. Create ibmcloud.env file containing the environment variable to access Watson Tone Analyzer service.
nano ibmcloud.env
VCAP_SERVICES_TONE_ANALYZER_TOKEN_ADDRESS=https://iam.bluemix.net/identity/token
VCAP_SERVICES_TONE_ANALYZER_SERVICE_API=YOUR_URL
Hit CTRL-O, Enter, CTRL-X to save the file.
Then create the config map using the following command :
kubectl create configmap env-ibmcloud-configmap --from-env-file=ibmcloud.env
root@iccws101:~/ICPGuestbook# kubectl create configmap env-ibmcloud-configmap --from-env-file=ibmcloud.env
configmap/env-ibmcloud-configmap created
-
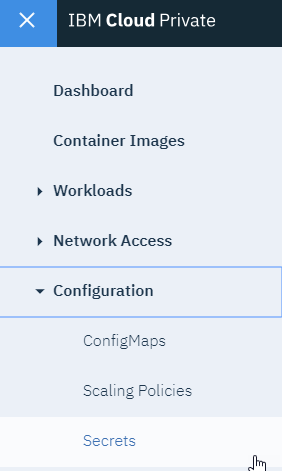
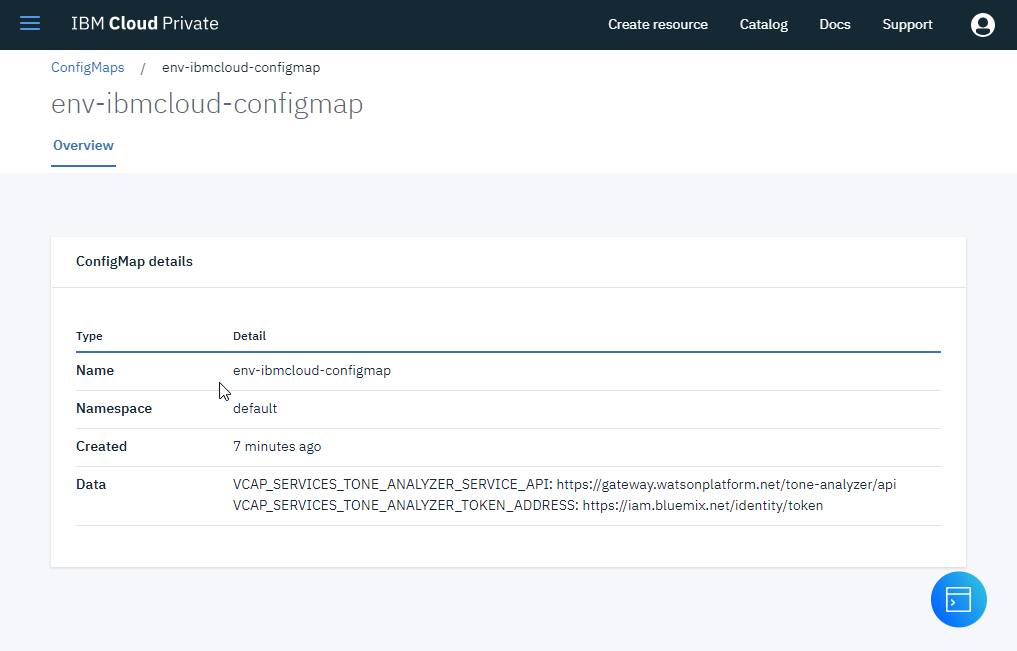
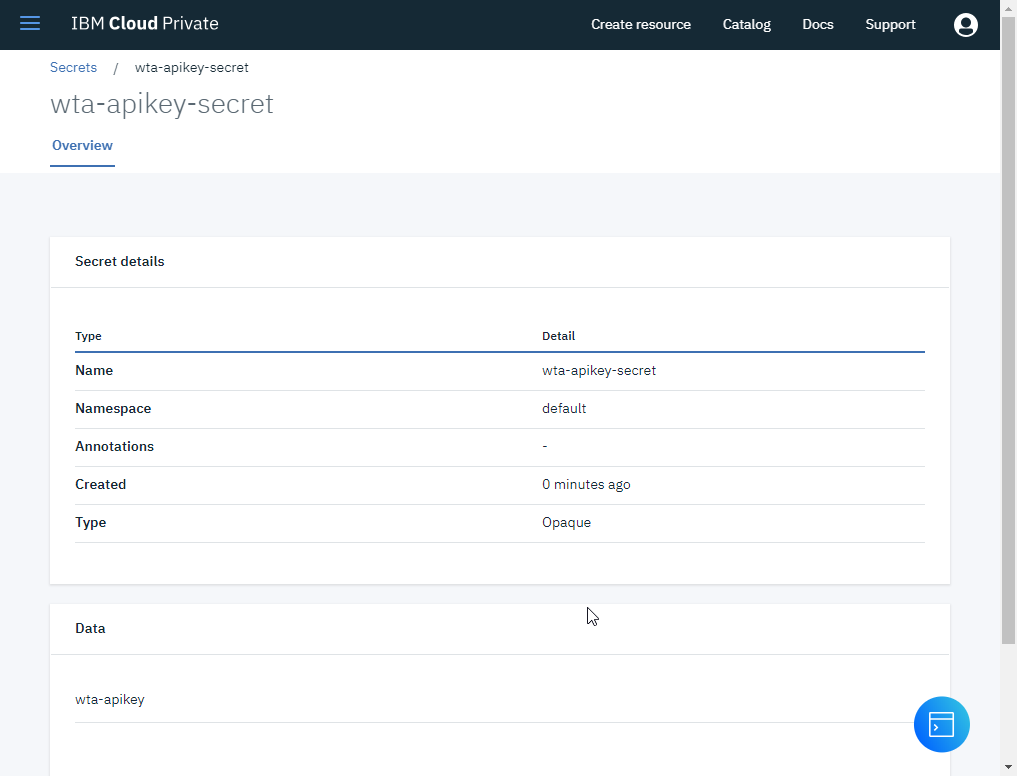
Go in IBM Cloud Private console to see the Secrets and ConfigMaps that has been created
- Deploy the analyzer application to ICP
- Open the
analyzer-deployment.yamland have a look at the env section of the file :
apiVersion: apps/v1
kind: Deployment
metadata:
  name: analyzer
  labels:
    app: analyzer
spec:
  selector:
    matchLabels:
      app: analyzer
  replicas: 1
  template:
    metadata:
      labels:
        app: analyzer
    spec:
      containers:
      - name: analyzer
        image: ibmcom/analyzer:v1.1
        imagePullPolicy: Always
        resources:
          requests:
            cpu: 100m
            memory: 100Mi
        env:
        - name: VCAP_SERVICES_TONE_ANALYZER_API_KEY
          valueFrom:
            secretKeyRef:
              name: wta-apikey-secret
              key: wta-apikey
        - name : VCAP_SERVICES_TONE_ANALYZER_TOKEN_ADDRESS
          valueFrom:
            configMapKeyRef:
              name: env-ibmcloud-configmap
              key: VCAP_SERVICES_TONE_ANALYZER_TOKEN_ADDRESS
        - name: VCAP_SERVICES_TONE_ANALYZER_SERVICE_API
          valueFrom:
            configMapKeyRef:
              name: env-ibmcloud-configmap
              key: VCAP_SERVICES_TONE_ANALYZER_SERVICE_API
        ports:
        - containerPort: 5000
          name: http
Don’t change the file
- Deploy the analyzer pods using the
analyzer-deployment.yaml:
 root@iccws101:~/ICPGuestbook# kubectl apply -f analyzer-deployment.yaml
 deployment.apps/analyzer created
Create the analyzer service using analyzer-service.yaml :
 root@iccws101:~/ICPGuestbook# kubectl apply -f analyzer-service.yaml
 service/analyzer created
Check the environment variables have been set :
- Retrieve Analyzer pod ID (here analyzer-58644696f7-8tzsj) :
root@iccws101:~/ICPGuestbook# kubectl get pods | grep analyzer
analyzer-58644696f7-8tzsj       1/1     Running   0          24s
- Enter the POD in interactive mode (use your own pod id) :
root@iccws101:~/ICPGuestbook# kubectl exec -it analyzer-58644696f7-8tzsj /bin/bash
root@analyzer-58644696f7-8tzsj:/#
- Look at environment variables :
root@analyzer-58644696f7-8tzsj:/# env | grep TONE_ANALYZER
VCAP_SERVICES_TONE_ANALYZER_TOKEN_ADDRESS=https://iam.bluemix.net/identity/token
VCAP_SERVICES_TONE_ANALYZER_API_KEY=xxxxxxxxxxxxxxxxxxxxxxxxxxxxxxxxxxxxxxxxxxxxx
VCAP_SERVICES_TONE_ANALYZER_SERVICE_API=https://gateway.watsonplatform.net/tone-analyzer/api
- Exit the pod shell (using
exit)
View the guestbook
You can now play with the guestbook that you just created by opening it in a browser.
-
Open ICP Console :
https://<<ipaddress>:8443/console/welcome -
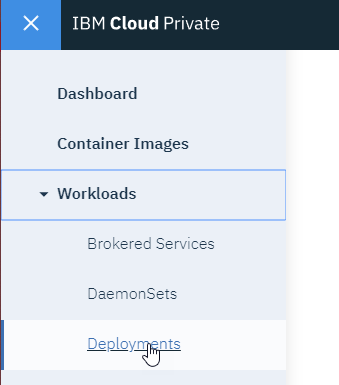
Open Deployments :
-
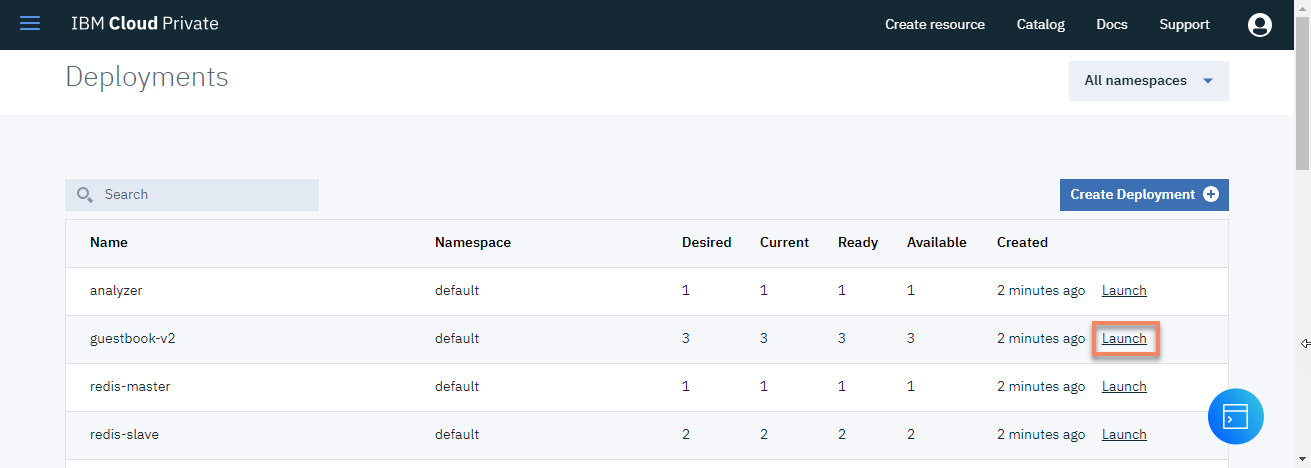
Click
Launchat the end of the guestbook-v2 line : -
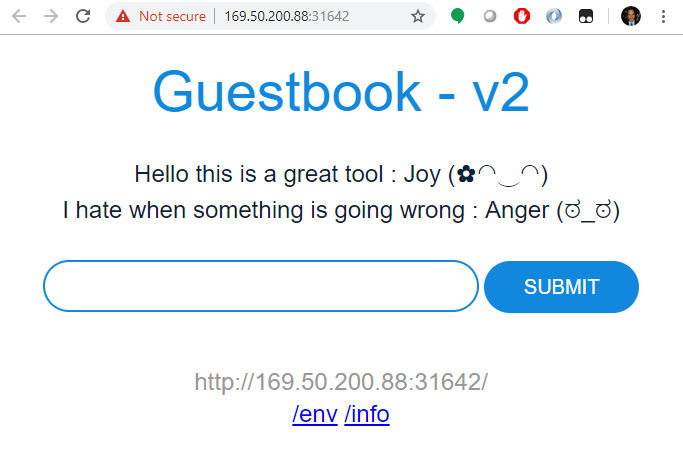
Congratulations : The guestbook displays in your browser
Your hybrid guestbook application is up and running, accessing Watson Tone Analyzer on IBM Cloud.
Cleanup
After you’re done playing with the guestbook, you can cleanup by deleting the guestbook service and removing the associated resources that were created.
Delete all the resources by running the following kubectl delete -f . command:
root@iccws101:~/ICPGuestbook# kubectl delete -f .
deployment.apps "analyzer" deleted
service "analyzer" deleted
deployment.apps "guestbook-v2" deleted
imagepolicy.securityenforcement.admission.cloud.ibm.com "guestbookimagepolicy" deleted
service "guestbook" deleted
deployment.apps "redis-master" deleted
service "redis-master" deleted
deployment.apps "redis-slave" deleted
service "redis-slave" deleted
ANNEXE
Challenge : Deploy the Hybrid application using the following architecture :